
Odd Verdure (Jam Version)
Cameras
Camera
"When you do things right, people won't be sure you've done anything at all." -God Entity, Futurama
In any platformer, the camera movement is one of those things that you only notice when it feels bad. When it's done well, the camera work goes completely unrecognized as it is already doing what the player is wanting.
This leads us to the key question: what does the player want to see? This question can have quite a bit of subtlety as context can play a large part in the ideal behavior of a camera.
Disclaimers & Definitions
This project was created in HaxeFlixel and the code will contain references to the libraries it provides.
Code samples included here are somewhat simplified and are intended for reference rather than a copy/paste solution for another project.
I will be using a few terms throughout this devlog, so I'll provide the definitions up front. Feel free to refer back to these once we get going:
1. Camera Deadzone - The rectangle that the camera target is kept within. By default, this is centered in the camera's viewport
2. Deadzone Offset - How far from centered along X and Y the Camera Deadzone should be shifted
Jam Version
The version of the camera we submitted was quite basic. It used a small deadzone with a slight offset to keep the player biased toward the bottom of the screen. Below you can see the camera's zone in blue, and the player's hitbox in pink:
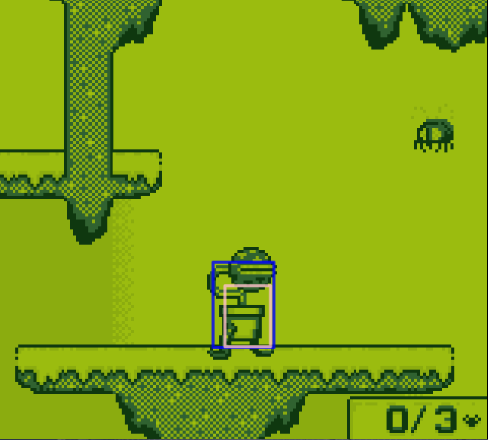
The only time the player is allowed outside of this box is when they are at the edges of the level and the camera is unable to both keep the player within it without also scrolling off the edge of the level.
The Camera Deadzone in Odd Verdure is 20 pixels wide and the player's hitbox is 15 pixels wide. This gives 5 pixels of player movement before the camera has to start moving. This little bit of wiggle room feels much better than just locking directly on to the player as they can make small adjustments without the whole screen adjusting.
The height of the deadzone in the jam version is 28 pixels. The player's hitbox is 20 pixels high.
The camera itself is very rigid in how it follows the player. We never change the deadzone offset and this leads to a very stiff feeling game. Here are a couple scenarios we'll use as reference:
Falling
"Stairs"
Release Version
Part of the desire with the release version is to have the camera be a little more helpful for the player. We'll use the scenarios picked from the Jam version as a guide for tuning the feel of our camera.
Guiding principle
For platformer style games, the player generally wants to be able to plan their actions in advance. The camera can help this by panning in the direction the player is moving. This gives the player the most information in the direction they are most likely to be interacting with soon.
The release version tackles the camera on two main behaviors:
1. Panning / Look-ahead to help the player see what they want
1. Restoration, or the camera's natural drift toward a "neutral" position
Panning
During playtesting and with feedback from the Jam voting period, the most common comment was around the difficulty of knowing what is above or below the player. We'll start with tackling the vertical aspect of the camera.
For the release version we've increased the height of the Camera Deadzone to 48 pixels. In the jam version, that tall of a deadzone would have caused the player to get far from the center of the screen, likely decreasing visibility at crucial moments. We will get into why that taller deadzone works in the Restoration section.
We can leverage the deadzone offset and adjust it based on the velocity of the player. By allowing up to 30 pixels of deadzone offset adjustment, we can greatly improve how much the player is able to see.
// Set the maximum adjustment we can make to the deadzone offset
private var maxOffsetMod = FlxPoint.get(0, 30);
// calculate the amount of offset to apply.
// Note that we bound this to be in the range of zero to one.
var speedModPercent = FlxMath.bound(Math.abs(player.velocity.y) / 150, 0, 1);
// And now we can calculate our offset adjustment by lerping from zero to our max offset mod value
dzOffsetMod.y = FlxMath.lerp(0, maxOffsetMod.y, speedModPercent);
// Apply the offset to the camera
FlxG.camera.targetOffset.copyFrom(dzOffset).addPoint(dzOffsetMod);
As the player begins to fall, this code moves the deadzone up on the screen. This causes the camera to stay further ahead of the player letting them better plan their landing. Note how the blue deadzone rectangle shifts up on the screen as the player's fall begins:
Once the player is on the ground, their interest will quickly shift back to wanting to see the terrain above them. This iteration of the camera resets the deadzone offset by shifting it back down to the original position, but the player is now awkardly at the top of the deadzone. This is where restoration comes into play.
Restoration
Once the player has returned to the ground, we want the camera to go back to providing good visibility above them as they will generally be interacting with the world at or above their current position.
We can achieve this somewhat simply by biasing the camera upward when the player is grounded.
private static inline var camLookScrollSpeed = 30;
if (player.grounded) {
    // move our player to the bottom of the deadzone
    camera._scrollTarget.y -= camLookScrollSpeed * elapsed;
}
The taller camera deadzone allows us some wiggle room to shift the camera around without having to add a bunch of special handling to the camera follow code. The final result has a much less rigid feel to it.
How does this feel for the stairs case?

Climbing back up the stairs seems perfectly fine! Walking down the stairs, on the other hand feels strangely springy in the camera movement as the camera feels like it's bobbing up and down. To adjust this, we will introduce a simple raycast against the level. When falling off of a platform, we'll cast a ray from the bottom of the player that sees if there is ground underneath them within a certain distance. If there is, we don't modify the camera deadzone offset. This means for small falls, the camera will be a little more rigid (removing the springy feel), and for longer falls, the camera still helps the player see what's ahead of them.

The raycast is shown as the magenta line that appears underneath the player when they are falling. If an intersection is found with the world, it is rendered as the small red box to indicate where the collision was found.
Conclusion
Cameras are a subtle thing that tweaking and tuning can consume a lot of development time. The camera in Odd Verdure attempts to find a good balance between simplicity and feeling good to the player. Hopefully, some of these tips and techniques have given some new insight into handling player expectations and camera behavior. Tuning this camera will continue as the game gets closer to completion, but we've found a good balance for the needs of the camera at this stage of development.
Comments
Log in with itch.io to leave a comment.
Super interesting article. I love the gifs and how they really highlight the point you are making. Without those, it would have been a very abstract conversation. But being able to see how the game is changed with those small improvements is really fascinating.